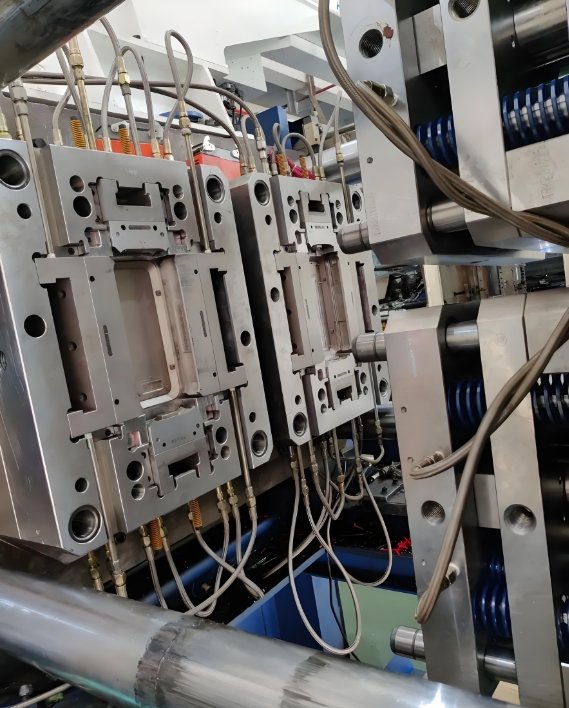
Installing a mold on an injection molding machine requires careful steps. It is important to follow these steps properly. This ensures the mold works well. It also helps avoid damage. Mold makers play a key role in this process. They prepare, install, and maintain the molds. Here’s a detailed guide on how to install a mold for injection molding.
Step 1: Prepare the Mold
The first step is to prepare the mold. Mold makers ensure the mold is clean. Dirt or debris can damage the mold. They also check for any damage. Mold makers inspect the mold for cracks, rust, or wear. Any issues should be fixed before installing it. The mold must be in perfect condition for injection molding.
Step 2: Position the Mold
The next step is to position the mold on the injection molding machine. The mold maker carefully places the mold in the correct position. The stationary half of the mold goes on the fixed platen. The moving half of the mold is placed on the moving platen. Mold makers ensure that the mold is centered. Proper alignment is important for injection molding.
Step 3: Secure the Mold
Now, the mold needs to be secured. Mold makers use bolts or clamps to hold the mold in place. The mold must be firmly attached to the platens. Loose molds can cause defects in injection molding. Tightening the bolts ensures that the mold stays in place during the process. Mold makers ensure everything is tight before moving on.
Step 4: Connect Cooling Lines
Next, the mold maker connects the cooling lines. Injection molding requires temperature control. Cooling lines help regulate the mold temperature. This prevents overheating. The mold maker connects water or coolant hoses to the mold. These lines carry coolant through the mold. Proper cooling is essential in injection molding. Without it, parts can overheat and deform.
Step 5: Connect Hydraulic or Pneumatic Lines
Some molds require hydraulic or pneumatic systems. These systems control mold components like ejector pins. Mold makers connect these lines to the mold. They ensure the lines are free from leaks. Proper connections allow for smooth operation during injection molding. Any leaks can cause the mold to fail. Mold makers carefully check all connections.
Step 6: Install the Ejector System
The ejector system is important for removing parts from the mold. Mold makers attach the ejector rods to the mold. These rods push the finished parts out after molding. Proper alignment of the ejector system ensures smooth ejection. This step is crucial in injection molding. If the ejector system fails, the parts can get stuck. Mold makers ensure the system works well.
Step 7: Check Mold Alignment
Before starting the injection molding process, mold alignment must be checked. The mold maker manually opens and closes the mold. This ensures both halves align properly. Misalignment can cause damage or defects. Proper alignment ensures that the mold operates smoothly. Mold makers double-check the alignment to prevent problems.
Step 8: Set Machine Parameters
The final step is to set the machine parameters. Mold makers program the injection molding machine. They set the injection pressure, speed, and temperature. These settings are based on the material and mold being used. Correct parameters are critical for quality injection molding. Mold makers must monitor these settings closely. Adjustments may be needed to optimize the process.
Test the Mold
After everything is set up, a test shot is performed. This is a trial run of the injection molding process. Mold makers watch closely for any issues. They check for defects, such as part warping or incomplete filling. If any problems arise, adjustments are made. The test shot ensures that the mold is functioning properly. It also helps confirm that the machine parameters are correct. Mold makers use this test to fine-tune the process.
Importance of a Mold Maker
A skilled mold maker is key to successful injection molding. They understand the importance of each step. Their expertise ensures that the mold is properly installed. Without a good mold maker, the process could fail. Mold makers play an important role in maintaining the quality of the mold. Their work prevents defects and ensures smooth production.
Why Proper Mold Installation Matters
Proper mold installation is essential for quality parts. If the mold is not installed correctly, problems can occur. Misalignment can cause parts to warp. Loose molds can create leaks during injection molding. Without cooling, parts can overheat and become unusable. Mold makers ensure that these issues do not happen. Their careful attention to detail guarantees a successful injection molding process.
Common Problems from Improper Installation
When molds are not installed correctly, various problems arise. Misaligned molds produce defective parts. Parts may have cracks or weak areas. Incomplete filling can also happen. This results in parts that are not fully formed. Leaks from poorly secured molds cause wasted material. Overheating can warp parts, making them unusable. These problems are costly and time-consuming. Mold makers prevent these issues by following proper installation steps.
Final Thoughts
Mold makers are essential to the injection molding process. They ensure the mold is properly prepared, aligned, and secured. Every step is important for successful injection molding. Cooling lines, ejector systems, and hydraulic lines must all be connected correctly. Machine parameters must be set according to the mold and material. A test shot helps confirm that everything is working. Proper mold installation leads to better-quality parts and fewer defects.
